Payloco Access and Signature
I、Integration Mode
Full-Service Payment Checkout (integrateMode:"Checkout")
Default Integration Mode, merchants only need to provide a checkout entry. After users click on it, they will be redirected to the Payloco checkout page to select a payment method and confirm the payment.
Designated Payment Method Checkout (integrateMode:"Checkout")
Merchants provide the payment method selection function. After users confirm their preferred payment method on the merchant’s checkout page, they will be redirected to the Payloco checkout page and directly proceed to the payment process without re-selecting the payment method.
Specify either the capabilityCode, or the paymentMethod and paymentBrand. For the specific values of the codes, please refer to the Payment Method List (https://docs.payloco.com/guide/methodList).
Pure API Direct Connection Mode (integrateMode:"API")
For merchants that have a fully self-owned payment checkout, including the functions of payment method selection and payment element collection, they can complete the acquiring and payment process only by connecting to Payloco's acquiring API interface, without going through the Payloco checkout at all.
1. The Pure API Mode refers to completing channel order placement while creating a payment order, and returning the payment link of the channel (e.g., deeplink, QR RawData, etc.). Merchants render their checkout page or perform a redirection action based on the returned payment medium.
2. Necessary parameters must be submitted in the API Mode.
- When using the mode of integrateMode: "API", you must specify the Capability Short Code (capabilityCode) during parameter submission. After this field is submitted, the paymentMethod and paymentBrand fields are optional.
- For non-local currency pricing, please use the Checkout Mode instead of the Pure API Mode.
- "deviceInfo": In the Direct Connection Mode, since the Payloco checkout is not involved, merchants are required to collect device information. This is to ensure that order creation can be completed correctly on the channel side. Meanwhile, accurate device information can effectively prevent false rejection by the risk control systems of channels or digital wallets. Therefore, it is strongly recommended to submit complete and accurate device information in the Direct Connection Mode.
3. Request Message Example
4. In the Pure API Mode, you need to process the returned message by yourself. When an order is created successfully, the apiPaymentAuth node will be returned. Developers need to determine the next action based on the content of the apiPaymentAuth.nextFlow node.
- When
nextFlow = Redirect, you can directly redirect the user's browser to the URL address specified innextFlowValue.
 "apiPaymentAuth": {
     "nextFlow": "Redirect",
     "nextFlowValue": "https://xxxxxxx.com/xxxxx/xxxxxx"
}- When
nextFlow = RedirectPost, developers need to assemble the parameters innextFlowObjectinto an HTTP request and submit it tonextFlowValueusing themethod=POSTformat.
"apiPaymentAuth": {
   "nextFlow": "RedirectPost",
   "nextFlowValue": "https://xxxxxxx.com/xxxxx/xxxxxx.php",
   "nextFlowObject": {
     "redirectMethod": "POST",
     "redirectParams": {
       "CustName": "",
       "TxnID": "1234567890",
       "TxnType": "SALS",
       "flag": "2",
       "Signature": xxxxxxxxxxxxxxxxxxxxxxx",
       "MerchantID": "PLharmony",
       "TxnChannel": "ESUN_ATM",
       "TxnAmount": "1000.00",
       "CustDesc": "Digital@:111:TWD1000.00",
       "ReferenceNo": "xxxxxxxxxxxxxxxxxxxxxxx",
       "TxnCurrency": "TWD"
     },
     "redirectUrl": "https://xxxxxxx.com/xxxxx/xxxxxx.php"
   }
}- When
nextFlow = QrCode, developers need to render the content ofnextFlowValueinto a QR code image and display it on the merchant’s checkout page.
"apiPaymentAuth": {
   "nextFlow": "QrCode",
   "nextFlowValue": "00020101021226880014br.gov.bcb.pix2566qrcode.microcashif.com.br/pix/a4c374ce-597c-48c8-bdef-c568f7e90ac75204000053039865802BR5906PODIUM6008SaoPaulo62070503***6304049E"
}- When
nextFlow = BankAccount, developers need to render the key-value pairs in JSON format fromnextFlowObjectinto bank account-related information and display it on the merchant’s checkout page.
"apiPaymentAuth": {
   "nextFlow": "BankAccount",
   "nextFlowObject": {
     "financialInstName": "Bank Rakyat Indonesia",
     "accountName": "Bank Transfer",
     "accountNumber": "123498549859432",
     "expireAt": "2026-01-09T13:48:18+08:00"
   }
}- When
nextFlow = Description, developers need to render the key-value pairs in JSON format fromnextFlowObjectinto prompt information and display it on the merchant’s checkout page.
 "apiPaymentAuth": {
   "nextFlow": "Description",
   "nextFlowObject": {
     "tips": {
       "0": {
         "id": "1",
         "description": "Please complete the payment on your mobile phone.",
         "type": "text"
       }
     }
   }
}- When
nextFlow = BarCode, developers need to render the content ofnextFlowValueinto a barcode image and display it on the merchant’s checkout page.
5. Compatibility Notes
- If order creation fails in the API Mode, the information of the apiPaymentAuth node will not be returned. This situation indicates that the channel fails to create an order due to insufficient accuracy of the data in the DeviceInfo node. In this case, you can still degrade to the Checkout Mode by redirecting to the checkoutUrl, thus ensuring that customers can complete the payment through the Payloco checkout page.
- Therefore, it is recommended that developers take checkoutUrl as the fallback processing logic. The Payloco checkout page has already implemented all the scenarios mentioned in Section 5.
II、Interface Information
Note: Configure for Different Environments
| Environment Type | Gateway API Address | Remark |
|---|---|---|
| Production Environment | https://api.payloco.com | For Formal Business Use |
| UAT Environment | https://uat-api.payloco.com | For Testing Purposes |
Interface List
| Product Type | Interface Name | Interface Address | Description |
|---|---|---|---|
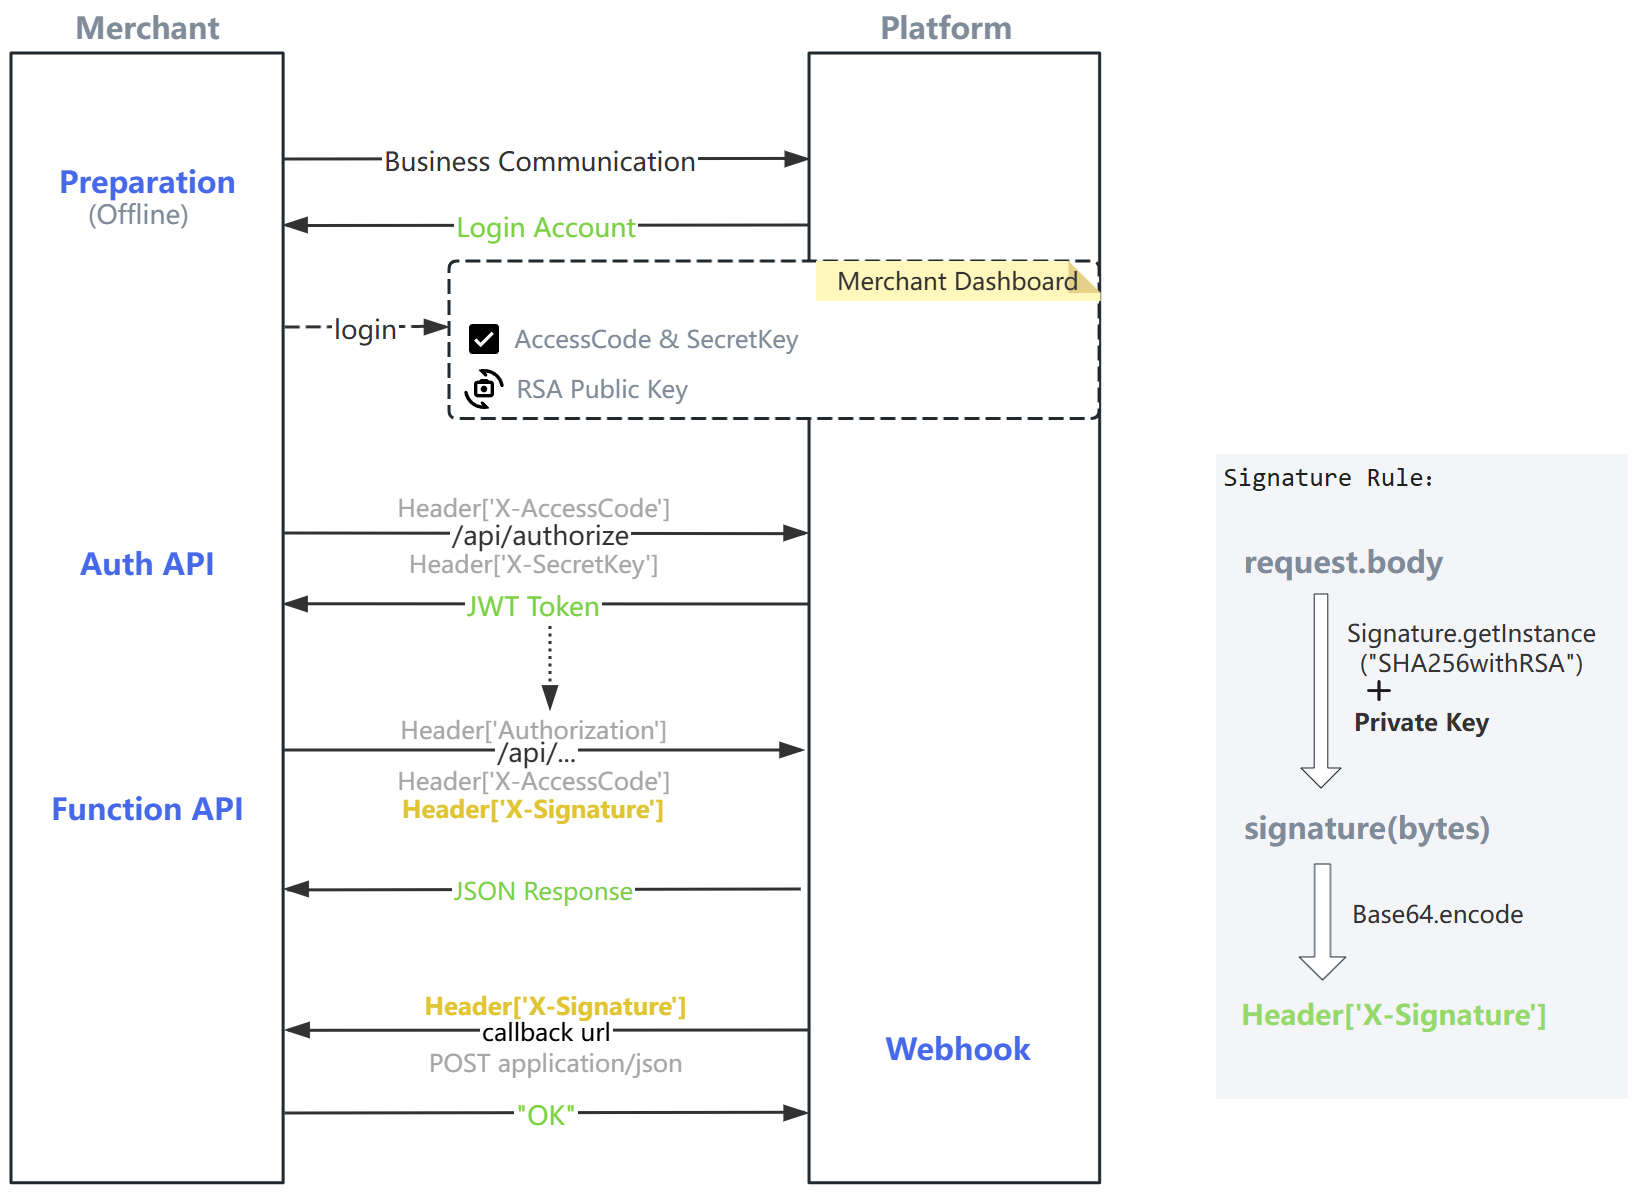
| Authentication | Get Token | /authorize | Obtain a JWT Token using X-AccessCode and X-SecretKey (this interface does not require signature, while all other interfaces do); add Authorization: Bearer + token to the header of all other interfaces; the returned expireIn field indicates the validity period of the token; note to distinguish the AccessCode and SecretKey between the [UAT Environment] and the [Production Environment]. |
| Payin | Create Order | /api/payment/create | Order Creation Interface (Note the difference between the default Cashier Mode: Checkout and Pure API Payment: API) |
| Payin | Transaction Query | /api/payment/get/{transactionId} | Transaction Query API |
| Payin | Refund | /api/payment/refund | Transaction Refund API |
| Payin | Asynchronous Notification | /webhook/eventName/acquire.payment.result | Merchant Receives Order Asynchronous Notification |
| Payout | Disbursement | /api/payout/create | Merchant Disburses Funds to Users (Withdrawal) |
| Payout | Disbursement Query | /api/payout/query{?requestId,transactionId} | Disbursement Query |
| Payout | Disbursement Callback | /webhook/eventName/payout.result.notify | Disbursement Callback |
| Account Balance | Account Inquiry | /api/balance/list{?currency} | Merchant Account Balance Query |
Interface Category
| Category | URI | Remark |
|---|---|---|
| Business Interface | /api/xxx | Different interfaces need to be integrated according to business requirements; the Authorization, X-AccessCode, and X-Signature parameters must be included in the request header. |
| File Interface | /file/xxx | For file upload or download interfaces, the attachment-type fields used in business interfaces require obtaining a file ID through the file upload interface first, before being used in business interfaces. |
Parameters marked as required are mandatory, while all other parameters are optional.
API documentation fields marked with required are mandatory, while unmarked fields are optional. 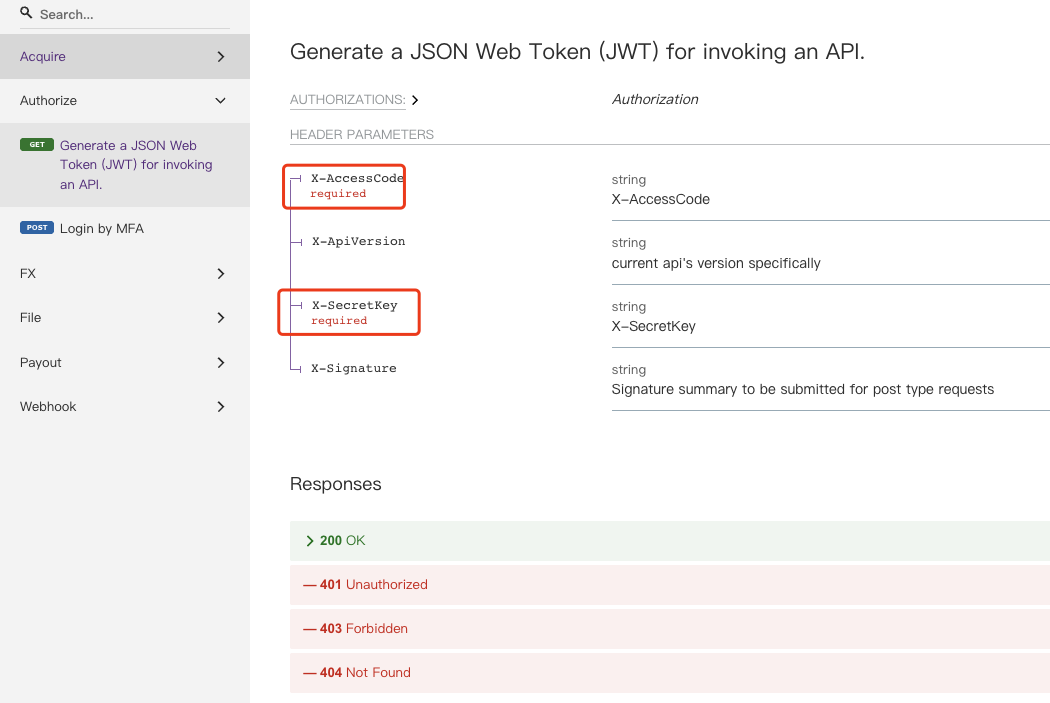
Ⅲ、Request Signature
Signature Description
Signature generation is a verification mechanism used by the Open Platform and merchants to ensure the integrity of interactive messages. The unified conventions are as follows:
- Generated RSA key pair information: keySize=2048, the public key complies with the X509 standard, and the private key complies with the PKCS#8 standard.
- Public key exchange: Both parties convert the public key to the PEM encoding format (Base64.getMimeEncoder) to facilitate text transmission and storage. Example:
-----BEGIN PUBLIC KEY-----
MIIBIjANBgkqhkiG9w0BAQEFAAOCAQ8AMIIBCgKCAQEAnafIZaXpIx6azTZkMS7B
20St6qEHdhv3vW/YLl58KRG1Mgsy5ZiPA6w31el5VSYKF4GQju0qHlYc6cmbpN0Q
z1Z0/xNAugKISIVwnVZw4P1DsYcUIvJaUCt8C+MYXxLUf2FEeCQP3oJCTEaQvIBz
mjFVVCSsAyQ7m3W/EXuwBWoqQJarzKYTLOjPNvRjtRznd1X470/ZEnTIDx/7nZvQ
luHy7hpL3r/YsFEAN0ZVigGcuso1zbqLjwTSi5Uo685F9oHiAs5Y+XE0lihWmb0D
nxVXXRznj191b5H21WVPcnrtKjmO+OSLL0JKlrqx0ndqe1pZBcliO28b0wIg1ftZ
pwIDAQAB
-----END PUBLIC KEY------ The RSA private key is used for signature generation, and the RSA public key is used for signature verification. The signature algorithm is
SHA256withRSA. - Note: Only the public key needs to be shared; please keep the private key properly and securely by yourself!
- Attachment: Reference for online key pair generation -> Go to (https://www.ssleye.com/ssltool/pass_double.html) (Please select
RSA-2048-No Password) - Attachment: Source code Demo for signature generation/verification -> Download (Java version)
- Attachment: Troubleshooting guidelines
Signature Rules
The merchant generates the signature, and Payloco performs the signature verification.
- When a merchant sends a request to Payloco, it uses its own private key to sign the request.body . Code example:
Signature signature = Signature.getInstance("SHA256withRSA"); signature.initSign(privateKey); // When calculating the SHA256withRSA signature, the byte stream must be converted using UTF-8 encoding; otherwise, it may lead to incorrect signature calculation for parameters containing Chinese characters. signature.update(request.body); byte[] signedHash = signature.sign();- Encode the signature content with Base64 to improve readability.
String signature = Base64.getEncoder().encodeToString(signedHash);- When a merchant sends a request to Payloco, add the signature to the request header (
X-Signature). - Note: Signing is only required for POST interfaces; the signature is generated for the
request.body. If the request.body is empty in some cases, signature generation is not required.
Payloco generates the signature, and the merchant performs the signature verification.
- When Payloco sends asynchronous request notifications to merchants (i.e., Webhook), it will sign the notification content with the Payloco platform private key. Merchants are required to verify the signature with the Payloco platform public key.
- Merchant Signature Verification: Perform signature verification immediately after reading the original requestBody; no processing or modification is allowed in between.
- Use
POSTrequests uniformly withContent-Type=application/json. - Agreement: When the merchant's callback URL receives our asynchronous notification request, it must return
OKto indicate that the merchant has successfully received the notification of this type from us.
Ⅳ、Response Design
Response Data Format
Response data is returned in JSON format, including code (response code), msg (response description), and data (business data).
Business Response Status Codes
For all Payloco interfaces, the success status is indicated by code=00000000, and the failure status is indicated by code != 00000000.
{
  "code": "00000000",
  "msg": "OK",
  "data": {
    "orderId": "20241216000001",
    "paymentStatus": "CREATED",
    "amount": 10000
  }
}
Ⅴ、General Information
Amount Transmission Rules
orderAmountThe order amount must be multiplied by 100, For example: if the order amount is 100.00, the transmitted value must be 10000, with the unit being cents.
Ⅵ、Flowchart
The overall diagram is as follows: